Wednesday, December 24, 2014

My Bohemian Sister's Cole Slaw

The amount of each ingredient you use is determined by your taste.  (What this means is my sister doesn't really know how much she uses; she just starts putting things in a glass measuring cup, and keeps tasting it until it's good.)

Ingredients for dressing
Real Mayonnaise, about 1-1/2 cups
Half and half, about 1/2 cup
Splash of balsamic vinegar
Splash of worcestershire sauce
Garlic powder (1 to 2 T)
Celery seed (1 tsp)
Sugar (2 T)
Dash of salt


Whisk ingredients together.  Dressing should be pourable, but thick.


Slice or chop one head of cabbage and place in large bowl.  Don't grate the cabbage, or chop it too fine; that will make your slaw too mushy.

Pour dressing over cabbage, toss well, and refrigerate, covered, at least 2 hours.


Great side dish for oven-roasted barbecue ribs.

My Bohemian Sister's Oven-roasted BBQ Ribs

Three secrets for cooking barbecued baby back ribs:

1.  They have to be fresh from the store (not kept in your freezer and then thawed).
2.  You have to remove the membrane on the bone side of the ribs.
3.  Head Country sauce, manufactured in Ponca City, Oklahoma, is the best barbecue sauce in Oklahoma, maybe in the nation, or even the world.  

A mess of ribs


First, pat the ribs dry with a paper towel.  Remove the thin membrane from the back (bony side) of the ribs.  Difficult, but important.  If you're lucky, and get it started right, it peels off in a thin sheet.

Place the ribs on a sheet of heavy duty aluminum foil.  

Sprinkle a dry rub on the meat.  She has used seasoning from the Rendezvous (Memphis, TN), Daddy Hinkle's, and is currently in love with State Fair Seasoning from the Oklahoma Pork Council.  Next we will try Head Country Seasoning.

Pour barbecue sauce over the meaty side of the ribs, and rub it in slightly.
Turn the ribs over and pour sauce into the "trough," the bony side.  Rub it in slightly.
Wrap the ribs in foil, sealing the foil.


Place the ribs, meat side down (trough side up) on a baking sheet.

Bake at 300 degrees  for 2 hours.  Open the foil, turn ribs over, so the meaty side is up.  Baste the meaty side of ribs liberally with barbecue sauce.  Leave foil open and return ribs to oven.  Start checking for doneness after 30 minutes.  

Test for doneness by pulling on one of the bones.  Bones should come loose easily.

We like these ribs better than the ones she smokes on the grill.  The grilled ribs take a lot longer and are not as moist and tender.

Serve with My Bohemian Sister's cole slaw and baked beans.


Monday, December 22, 2014

Honey Mayes is Cookin' Blarney Stones

Honey Mayes is my mother-in-law, and she has been cooking for over 70 years.  She grew up on a farm in western Oklahoma, wearing dresses made from feed sacks (it takes three 100-pound feed sacks to make a dress), picking potato bugs off the plants and dropping them in kerosene, milking cows and gathering eggs in the mornings, killing chickens for dinner, and using an outhouse to do her business.  She knows what it really means to be a pioneer woman.

Blarney Stones are tasty little sweet and salty nut-covered cakes that everyone loves but no one understands why they are so darn good.


This is one of those unsophisticated basic-ingredient recipes that is simple but tastes irresistible. 


Ingredients
Box yellow cake mix
Powdered sugar/milk/vanilla icing
24 oz.chopped dry-roasted peanuts

Bake the cake according to package directions.  When cooled, cut into 2 x 2” sections.  Place cake sections on baking sheet, cover with plastic wrap and foil, and freeze.  The freezing makes the cakes easier to handle during the icing stage.


Prepare icing. With a hand mixer, blend 4 C powdered sugar, 1/2 C milk, and 1 tsp vanilla until smooth.


Chop the peanuts in the food processor.


Remove about eight cakes at a time from the freezer.  You don't want them all to thaw out while you are icing them.

Ice all sides of each cake and sprinkle with nuts on all sides.  It’s kind of a mess, and the icing gets all over your hands.  Challenge yourself by trying to lick the icing from your elbows.


Place one layer of iced, nut-crusted cakes on a cake plate, lay a sheet of wax paper on top, and stack the next layer of cakes on the wax paper.


It's an unpretentious little recipe and a messy process, but everyone loves these Blarney Stones.  

Place them on a plate in a circle and call it Blarney Stonehenge if you are feeling particularly silly.

Honey Mayes is Cookin' Cranberry Salad

Honey Mayes is my mother-in-law, and she has been cooking for over 70 years.  She grew up on a farm in western Oklahoma, wearing dresses made from feed sacks (it takes three 100-pound feed sacks to make a dress), picking potato bugs off the plants and dropping them in kerosene, milking cows and gathering eggs in the mornings, killing chickens for dinner, and using an outhouse to do her business.  She knows what it really means to be a pioneer woman.

Honey has been making cranberry salad for over 50 years, since before there were food processors, and she used to chop all the ingredients with a hand-cranked grinder .  Her cranberry salad is a traditional holiday favorite.  Pecans, apples, and celery give this salad a satisfying crunchy texture; sugar and Jell-o provide the sweetness to balance the tartness of the cranberries.  Eat it as a side dish with turkey or ham, use it as a condiment on a cold turkey sandwich, spread it on toast, or eat it alone as a dessert.


Honey can’t imagine anyone eating canned, jellied cranberry sauce when they can have this good stuff.

Ingredients 
4 stalks celery, cut into about 3" lengths
4 Fuji apples, quartered, cored, seeded.  DO NOT PEEL
2 12 oz. bags Ocean Spray fresh cranberries
2 3-oz. boxes Jell-o, black cherry flavor
4 C sugar
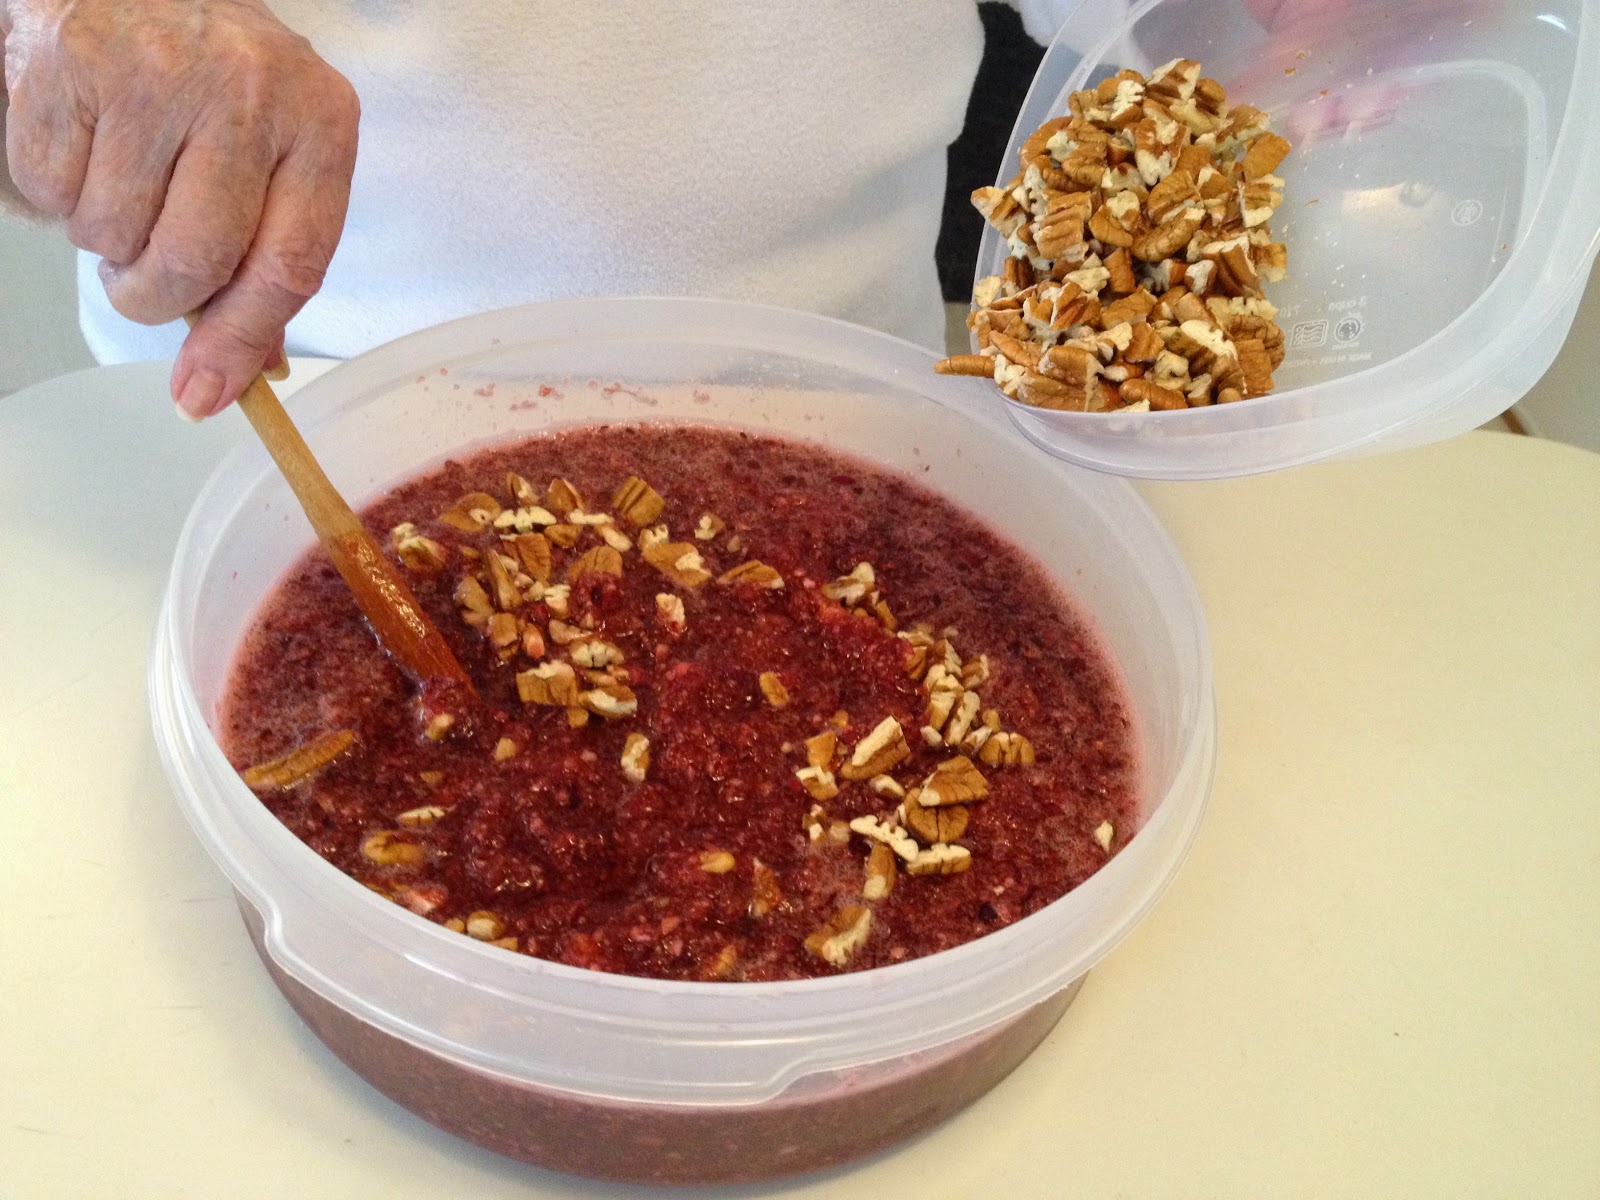
2 C pecans, chopped coarsely

Instructions

Process (in batches) the apples, celery, and cranberries in food processor, until minced.  
Place processed ingredients in very large bowl.


Add sugar, and stir well.

Cover and place mixture in refrigerator for 24-48 hours to allow sugar to be absorbed.

Dissolve Jell-O in 2 C hot water.  Add Jell-O to refrigerated salad mixture.  Stir well.


Add pecans.  The pecans are NOT ground, nor are they processed in the food processor.  They are chopped coarsely.  Honey says if you are going to grind up your pecans, don’t even bother making this recipe or she will haunt your kitchen.


Let the mixture set 2 hours.  The mixture stays “loose” and spoonable.  It will not become firm or gelled like a bowl of plain Jell-O.  

Thursday, December 18, 2014

Sew fleece-lined high-top slippers with just two pattern pieces


This fairly simple bootie pattern appeared on www.coatscrafts.co.uk.  I edited the intructions to clear up confusion in step 3 and added some other instructive details to help avoid common mistakes.
Click here for the pattern for these booties in size 7-8 (child). 
Click here for pattern in size 11-12 (child).


Using the shoe pattern, cut 4 pieces of outer fabric, 4 pieces of lining fabric, and 4 pieces of batting.  Using the sole pattern, cut 2 pieces of lining fabric, 2 pieces of batting, and 2 pieces of a non-slip gripper fabric, such as Dritz Anti-skid Gripper Fabric for Pajamas and Slippers.


If you can't find anti-skid fabric, cut 2 pieces of some other fabric and--when the slippers are completed--apply hot glue to create anti-skid "treads" on the bottom of the slippers (as shown on prudentbaby.com).


Transfer the "A" and "B" marks from the pattern to your fabric (both outer fabric and lining).

Mark the center of the sole fabric at the toe with a large dot.  Mark the center of the sole fabric at the heel with a different color dot (or an X).  You want to distinguish the toe from the heel, so you don't sew the sole on upside down.

All seam allowances are 3/8".

Follow the eight steps below, and you'll have soft, warm slippers in no time.

1.  Quilt the outer fabric and the batting together.


Lay the fabric on the batting, and with the right side of fabric facing up, stitch vertically, horizontally, or any way you want.  If the fabric has a pattern, you could stitch along the lines of the pattern.


2. Stitch the shoe pieces of the outer fabric right sides together along the back seam.  Do the same with the shoe lining pieces.


Open out the outer fabric pieces and the lining pieces.


Wrong side of outer fabric, opened out.


Wrong side of lining fabric, opened out


3.  With right sides together and seams aligned, stitch together outer shoe and lining from mark A, upward, across the top of the bootie, and down to mark A on the other side.  Backstitch several times at both of the "A" points.


4.  Bring the outer pieces right sides together (keeping lining pieces out of your way), and stitch together from mark A to mark B, at the toe of the bootie.  Do the same with the lining pieces.  Backstitch several times at the A points.


5.  For the sole, lay fabric pieces together, wrong sides facing, with the anti-skid fabric on bottom, batting in the middle, and lining fabric on top.  Stitch all three layers together around outer edges.

(As you can see, the lining fabric for this slipper sole matches the outer fabric.)


6.  Pin sole to shoe.  Match toe seam of shoe to large dot on sole.  Match heel seam of shoe to different-colored dot (or X) on sole.  Make sure right sides are facing:  the anti-skid fabric of the sole is facing the outer fabric of the shoe.  Stitch all the way around.


7.  Trim seam.  Finish edges of seam allowance with zig-zag stitching.


8.  Turn slipper right side out.


Make the second shoe in the same manner.  Soft, warm high-top slippers are ready to wear.


Spelling tip of the day:  The word "separate" is often misspelled as "sepErate."   Just remember, there's "a rat" in sepARATe. 


Monday, December 15, 2014

Towel hangers: update on an old favorite

Towel hangers keep your kitchen towels from falling off the towel rod, and keep little hands from pulling towels off the oven door handle.  You've seen them crocheted or sewn on with a button.  This updated version is my own design.  It's easy to make, reversible, requires no buttons or buttonholes, and looks attractive.


Make some for the bathroom hand towels, too.

Here's how.

Cut a right angled "V" from the 8-1/2" corner of a piece of cardstock.


Use a disappearing ink pen to outline the pattern

Use the pattern to cut two V-shaped pieces of coordinating fabric.


Stitch the two "V" pieces, right sides together, 3/8" seam allowance, leaving the inner notch of the V open for turning


Clip corners and turn the V right side out.

Use a wooden stick to push corners out.
Clip the inner V about 1/4".
 Press under the inner seam allowance that you left open for turning.


Topstitch the inside of the V (or topstitch ALL sides of the V, if you prefer).
Pin the finished V to the towel.  Pleat the section of the towel between the two "legs" of the V.


Stitch through all thicknesses of pleated towel and V fabric.  Stitch again over pleats.

You are ready to hang your towel.

Insert the V fabric of the towel behind the towel rod.  It doesn't matter which side, because it's reversible.


Insert the other end of the towel into the triangle where the V is sewn to the towel edge.


Pull the towel down.


Make a matching pocket potholder and give as gifts.  Click here for pocket potholder instructions


Grammar tip of the day:  Their belongs to them.  There tells where.  They're not interchangeable.